Setup DKIM on Postfix with dkim-milter
March 10, 2009 at 11:54 PM | categories: Postfix, Howto, DKIM, Centos, Email | View CommentsIntroduction
DKIM is an authentication framework which stores public-keys in DNS and digitally signs emails on a domain basis. It was created as a result of merging Yahoo's domainkeys and Cisco's Identified Internet mail specification. It is defined in RFC 4871.
We will be using the milter implementation of dkim http://dkim-milter.sf.net on centos 5.3.
This howto has been updated to allow for the following.
- Multiple domains using different keys
- Same domain using different selectors
- Selective signing of email
Older versions are provided below for reference.
Installation
I provide Centos rpms for Dkim-milter at http://www.topdog- software.com/oss/ so we will install the latest version.
Install the rpm, ( 32bit and 64bit intel supported )
# wget http://www.topdog-software.com/oss/roundcube/andrew_topdog-software.com_key.txt
# rpm --import andrew_topdog-software.com_key.txt
# http://www.topdog-software.com/oss/dkim-milter/dkim-milter-2.8.2-2.$(uname -i).rpm
Generate the Keys
# dkim-genkey -d <domain_name> -s <selector> -t
Replace
-
.txt - contains the public key you publish via DNS -
.private - the private key you use for signing your email
Create a sub directory in /etc/mail/dkim/keys to store your key, i prefer to
use the domain name
# mv <selector>.private /etc/mail/dkim/keys/<domain_name>/<selector>.pem
# chmod 600 /etc/mail/dkim/keys/<domain_name>/<selector>.pem
# chown dkim-milt.dkim-milt /etc/mail/dkim/keys/<domain_name>/<selector>.pem
DNS Setup
You need to publish your public key via DNS, client servers use this key to
verify your signed email. The contents of
default._domainkey IN TXT "v=DKIM1; g=*; k=rsa; p=MIGfMA0GCSqGSIb3DQEBAQUAA4GNA
DCBiQKBgQDG81CNNVOlWwfhENOZEnJKNlikTB3Dnb5kUC8/zvht/S8SQnx+YgZ/KG7KOus0By8cIDDv
wn3ElVRVQ6Jhz/HcvPU5DXCAC5owLBf/gX5tvAnjF1vSL8ZBetxquVHyJQpMFH3VW37m/mxPTGmDL+z
JVW+CKpUcI8BJD03iW2l1CwIDAQAB" ; ----- DKIM default for topdog-software.com
Also add this to your zone file. (This sets your policy see http://www.sendmail.org/dkim/wizard for an explanation or refer to the RFC)
_adsp._domainkey IN TXT "dkim=unknown"
Configuration
Edit the file /etc/mail/dkim/keylist and add your domain using the following format
*@<domain_name>:<domain_name>:/etc/mail/dkim/keys/<domain_name>/<selector>
#sign only for andrew
andrew@<domain_name>:<domain_name>:/etc/mail/dkim/keys/<domain_name>/<selector>
Add your servers IP addresses to /etc/mail/dkim/trusted-hosts
More advanced configuration options can be set in the file /etc/dkim-filter.conf (Refer to the file and the man pages for details)
Configure Postfix
You need to add the following options to the postfix main.cf file to enable it to use the milter.
smtpd_milters = inet:localhost:20209
non_smtpd_milters = inet:localhost:20209
Append the dkim-milter options to the existing milters if you have other milters already configured.
Start dkim-milter and restart postfix
# service dkim-milter start
# service postfix restart
Testing
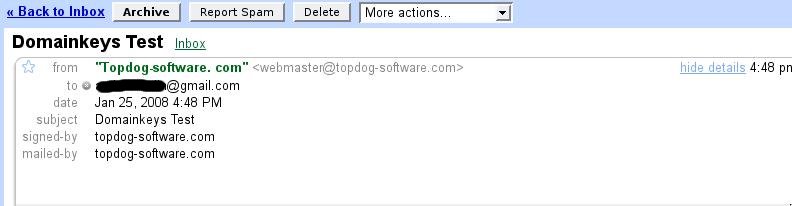
Send an email to sa-test@sendmail.net or autorespond+dkim@dk.elandsys.com, you will receive a response stating if your setup is working correctly. If you have a Gmail account you can send an email to that account and look at the message details similar to the picture below, you should see signed-by “your domain” if your setup was done correctly.
Updates
Updated rpms are always provided at http://www.topdog-software.com/oss/dkim-milter/
blog comments powered by Disqus
About
I am a Sysadmin and programmer, passionate about Open source software A few notable projects i am associated with are:
Contact
topdog at fedoraproject.organdrew at topdog.za.net
Follow me on Twitter

Latest blog posts
Categories
- Book review (rss) (10)
- CCSP (rss) (1)
- Centos (rss) (16)
- Certification (rss) (1)
- Cisco (rss) (1)
- CouchDB (rss) (1)
- Cyrus (rss) (2)
- DHCP (rss) (2)
- DKIM (rss) (2)
- DLNA (rss) (2)
- DNS (rss) (2)
- Domainkeys (rss) (1)
- Email (rss) (11)
- Exim (rss) (7)
- Fedora (rss) (1)
- Horde (rss) (2)
- Howto (rss) (29)
- IPSEC (rss) (6)
- IPv6 (rss) (1)
- Kickstart (rss) (1)
- Links (rss) (2)
- Linux (rss) (25)
- Mac OS X (rss) (6)
- Markdown (rss) (1)
- Mediaplayer (rss) (2)
- PHP (rss) (1)
- PS3 (rss) (2)
- Postfix (rss) (6)
- Projects (rss) (1)
- PyMYSK (rss) (14)
- Python (rss) (19)
- RHEL (rss) (7)
- SSL (rss) (2)
- Security (rss) (13)
- Sysadmin (rss) (16)
- Tips (rss) (28)
- Ubuntu (rss) (2)
- Unix (rss) (4)
Archives
- February 2014 (1)
- December 2013 (1)
- September 2013 (1)
- March 2013 (1)
- February 2013 (2)
- January 2013 (4)
- November 2012 (3)
- October 2012 (2)
- September 2012 (5)
- August 2012 (7)
- July 2012 (1)
- June 2012 (2)
- May 2012 (9)
- April 2012 (17)
- March 2012 (4)
- August 2010 (1)
- March 2009 (4)
- January 2009 (2)
- August 2008 (1)
- June 2008 (1)
- March 2008 (1)
- February 2008 (2)
- January 2008 (1)